Good Morrow,
Mythical creatures and fair ladies love a good bauble or trinket, so I thought I’d share one of my favorite ways to create my own.
Flower seed bead bracelets are customizable, simple, and a wonderful little craft. Once you learn the pattern, you can take it in any direction you’d like. You can make bracelets, necklaces, rings, hair accessories, keychains, anything your heart can dream of.
You can also mix the flowers with other patterns or use the flower on its own.
What You’ll Need
- Seed beads
- Beading thread or string
- Two needles (not necessary, but makes threading the beads easier)
- Scissors
- A clasp or another method of securing your finished piece
Making the Flower
Follow the pattern below to create your first flower. Once you’ve made one, simply continue the pattern to create a chain of flowers until your piece reaches the desired length.
Don’t be afraid to experiment with your colors! You can make traditional little flowers, use your favorite color combination, match your Renaissance Faire outfit, or create something completely unique.
The Pattern
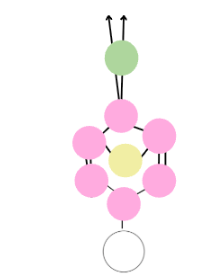
The pattern may look a little intimidating at first, but once you get the hang of it, it becomes surprisingly simple. Each flower is made by weaving the beads back through the previous row, creating the petals and center.
Follow the graphics below step by step, and before long you’ll have a whole garden of tiny flowers.
Additionally, if you are using a needle, thread the end of each string through and use it to thread through the beads. The needles also need to be thin enough to easily slip through the beads.
Step 1 — Start Your String
Add your first beads and position them according to the pattern.

Step 2 — Create the Petals
Follow the illustrated bead path to begin forming your first flower.
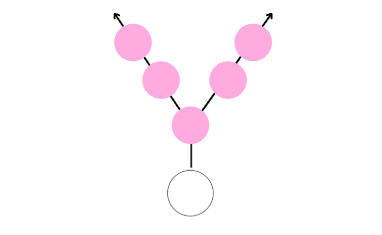
Step 3 — Add the Center
Thread both strings through your center bead.
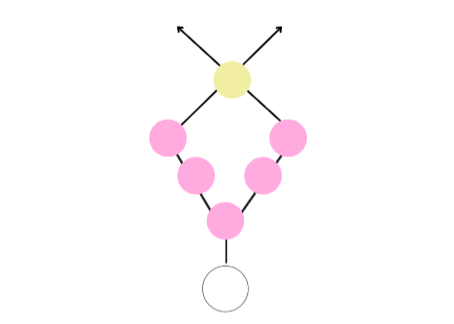
Step 3 — Loop the threads back through the previous beads
Take the strings and loop them back through the second and third beads on each side.
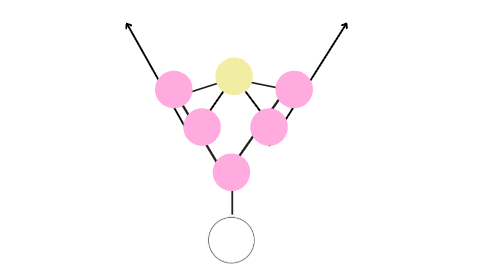
Step 4 — Take the two threads and thread them through the last bead
Take the strings and add another petal bead and thread both threads through it.
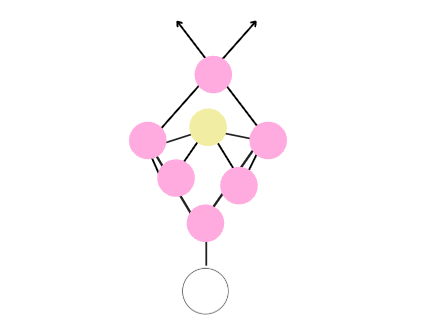
Step 5 — Take the two threads and add separator beads
Thread both strings through as many separator beads as you’d like. This step is optional; you can start another flower by adding another petal bead if you’d like.
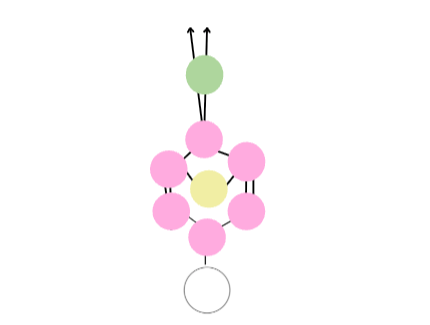
Step 6 — Begin the Next Flower
Once your first flower is complete, continue directly into the next one. Repeat the pattern until your bracelet reaches the desired length.
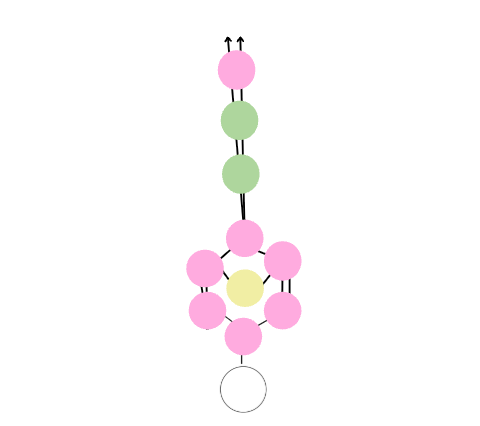
Step 5 — Finish Your Bracelet
Secure the ends of your thread and attach your chosen clasp.
Make It Your Own
Once you’ve mastered the basic flower, the possibilities are nearly endless.
Use the flowers to make:
- Bracelets
- Necklaces
- Rings
- Hair accessories
- Keychains
- Bag charms
- Anything else your heart can dream up
You can also combine the flowers with other seed bead patterns to create something more elaborate, or use a single flower as a little decorative accent.
There is something particularly satisfying about taking a handful of tiny beads and turning them into something that looks like it belongs in the jewelry box of a fairy.
So gather your beads, pick your colors, and start stringing.
Happy crafting, fair Ladies, Gents, and Creatures.

